Making your own rawhide is much easier than tanning a hide for the novice, and quite inexpensive. Here is how it’s done.
![]() If you live in hunting country, you can probably get a hunter to give you a raw deer or elk hide for free to make your own rawhide, or perhaps someone who butchers just a few animals for personal use will give you a cow, goat or pig hide at butchering time. Many hunters and small time meat producers have no use for the hides, and will be glad to get rid of them.
If you live in hunting country, you can probably get a hunter to give you a raw deer or elk hide for free to make your own rawhide, or perhaps someone who butchers just a few animals for personal use will give you a cow, goat or pig hide at butchering time. Many hunters and small time meat producers have no use for the hides, and will be glad to get rid of them.
Domestic sheep and goat hides can be used for drum heads, but will produce a very thin skin and are easy to tear. They also wear out faster and produce a very high pitched drum.
Pig is extremely thick, much more difficult to work with, and harder to dehair but works well where extra strength is needed and can be substituted for moose or buffalo for moccasin soles and works well for heavy pack bags.
Bear is also a bit more difficult for the novice to work with and will require a lot of scraping to remove excess fatty tissue. You probably wouldn’t want to waste a bearskin for rawhide, anyway.
The skins from male animals are usually thicker than the females. Elk is generally the preferred hide for making a quality drum, producing a head with a rich but mellow sound, but deer hide is often used, particularly for women’s hand drums.
Goat hides are an acceptable substitute and will probably be more readily available. They are a bit thinner than deer but are often used as a cheaper substitute by commercial drum producers.
However, goatskin drums won’t give you as rich a sound and it’s easy to tear them when lacing your drum if you stretch them too tight or cut your lacing holes too close to the edge.
Cow hide would most closely compare to elk, but is slightly thicker. Horse hide would be similar to buffalo, although just a bit thinner.
Prepared rawhide can be purchased at some large craft stores and saddlery shops. However, it usually comes in large sheets and can be quite expensive.
Usually the cost for materials needed for a large hide are under $10.00, while a similar hide purchased from a leather outlet or craft store would run around $75 to $175.00, depending on the animal, the size of the hide and supply in your area. You can even make rawhide using materials that are probably totally free.
The hard part in making your own rawhide that requires some elbow grease is scraping all visible fat from the under surface of the raw hide. There are commercial tools for this, or use a flat knife that is a comfortable size for your hand.
Careful skinning can greatly reduce this chore. Stretch the raw hide out the best you can on a flat surface and stake it down. You can do this outdoors on the ground, or nail it to a piece of plywood or a wall in your garage.
Remove as much of the visible fat and meat as you can, scraping with the grain of the hide and being careful not to cut it. Stretching the hide as tightly as you can will help prevent nicks and tears in the hide from the scraping process.
Once the fleshing chore is done, turning a raw skin into rawhide is a fairly simple process. Simply fill a large container (your bathtub works great for this if you can do without it for a couple days and aren’t too fussy) that is large enough to hold the hide without excessively crowding it with about four to six inches of lukewarm water covering the hide.
If you don’t want to make this mess in your bathtub, a large metal wash tub or barrel will work well. A large trash can will also work, but is a bit harder to stir. You can use any container that will hold enough water to cover the raw hide without scrunching it up too tightly, and still gives you room to stir it. You probably need at least 12 to 15 gallons of water at a minimum, and possibly more, depending on the size of the hide you are working with.
Two common mistakes made by home tanners are soaking in containers that are too small and not stirring. You want lots of room to stir the hide around and you want to stir it a lot.
As you are running the water into your tub or container, pour in about two pounds of lime (which you can purchase at your local garden center labeled as fertilizer – the bag should say hydrated lime or calcium hydroxide.) into the tub or container and stir it around until the lime is dissolved. (A $10.00 bag of lime is enough to do 70 deer hides.)
You may want to wear rubber gloves as you do this, since lime is very drying to your hands.
You can even use your own ash instead of lime, which is probably free. Lye, a.k.a. sodium hydroxide or potassium hydroxide, can be substituted for hydrated lime. Also wood ash will work. You must be careful using lye because it can be made too strong, in which case your hide may swell to the point of cracking the grain layer.
Wood ash is not hard to come by. You don’t want ash from burnt garbage, just wood. Hard wood ash has more lye in it and also can be made too strong so be careful with it. With softwood ash, the chances of making it too strong are slim. When working with ash, I sift ash through a screen to get the big pieces of charcoal out. There’s no risk of making a hydrated lime solution too strong. The water can only soak up so much and the rest settles to the bottom.
For me, using commercial lime is worth a few dollars just for the convenience, since it is ready to use right out of the bag.
Add the raw hide and swish it around in your water solution until it is thoroughly saturated. Weight the hide down with a couple rocks, cement blocks, or other heavy object to hold it under the water and let it soak for about twenty-four hours or longer, depending on the size and thickness of your hide. Every few hours remove the weight and swish the hide around a bit and turn it over to be sure all parts of the hide are being exposed to the lime.
After twenty-four hours check to see if the hair is beginning to loosen. When it is ready, most of the hair should pull off easily with a gentle tug. You may have to scrape the hide some to remove small, fine hairs completely. This is particularly true with pig skin.
Depending on the temperature, size and thickness of the hide, it will take about one or two days for the hair to loosen, up to a week in cool weather outdoors when you are working big, thick hides. On thinner, small hides such as rabbit, it may only take a few hours to get the hair off. Don’t leave the hide in the lime solution longer than is necessary because the lime will weaken the hide if you leave it too long.
Especially in warm weather or in a heated house, if the hide is not ready after twenty-four hours, you should drain the water and repeat the process of adding more lime and fresh water, or your hide will become smelly. I like to do this every 24 hours, regardless.
Once the hair comes off readily in your hand, scrape the hide with a flat bladed knife or other object with a straight edge, going with the grain of the hide. The hair should come off easily.
If you are working in your bathtub, at this point drain the tub and clean up what you can of the resulting mess. Be sure to put a washrag or other barrier over the drain opening as you drain it so you don’t plug up the drain with excessive hair.
Rinse the hide under the running faucet until all traces of hair are gone and wring it gently in a twisting motion (like wringing out wet clothes) several times to flush out the lime residue.
Fill the tub again, adding a small can of cream of tarter and about half a box of baking soda. Let the hide soak a couple more hours in this solution, then rinse thoroughly again several more times.
This will give the hide a white almost translucent color and finish removing all traces of the lime, which can break down the cells of the hide.
Wring out as much of the water as you can. Your hide is now rawhide.
You can stretch it out on a flat surface where it will get good air circulation, or fold it over a clothesline and let it dry for later use or use it immediately.
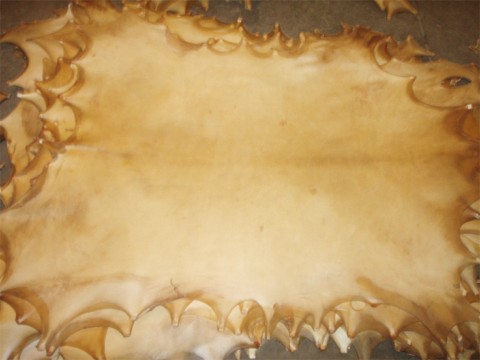
If you want to get the most area out of your hide, lace it to a rectangular frame before doing the final scraping, starting at the bottom of the hide and alternating sides as you tighten. This will make the hide stretch longer instead of wider, which gives you the most surface for cutting out large drum heads or long laces. It also makes the rawhide dry a more opaque color, rather than the transparency you can get if you just thorw it over a clothesline to drip dry.
If you want to save it for later use, once the rawhide is dry, roll it gently and tie with a string for storage.
When you are ready to use the rawhide, soak it again in a five gallon bucket of plain water until it is soft again, usually about twelve to twenty-four hours, depending on the thickness of the hide.
If the hide is taller than the bucket, just put one end in the water, then keep pushing it down as the lower part softens. Usually you will be able to submerge the whole hide within a couple hours. Or you can cut the dried rawhide with sharp scissors and only soak as much as you need for your current project. However, it is much easier to cut once it’s hydrated.
Once the dehaired hide is hydrated again, you can easily cut it into strips or shapes with ordinary scissors. If you don’t need it all, you can just dry out the remaining pieces and store again until needed.
If you soak a piece of rawhide, then something comes up and you aren’t ready to use it when you planned, you can keep it hydrated for a few days and it won’t hurt it as long as you change the water at least once or twice a day, depending on the temperature. If you don’t keep it in clean water, bacteria will begin to build up and it will get stinky, so change the water often.
Repeated soakings for a long time will give it a yellowish cast that will deepen each time it is dried out and then resoaked, and eventually will weaken the hide, particularly in warm weather, so it is best to use it as soon as it is fully hydrated. However, this is an easy way to give your rawhide an aged appearance for your artifact replicas where great strength isn’t necessary and you want them to look old.